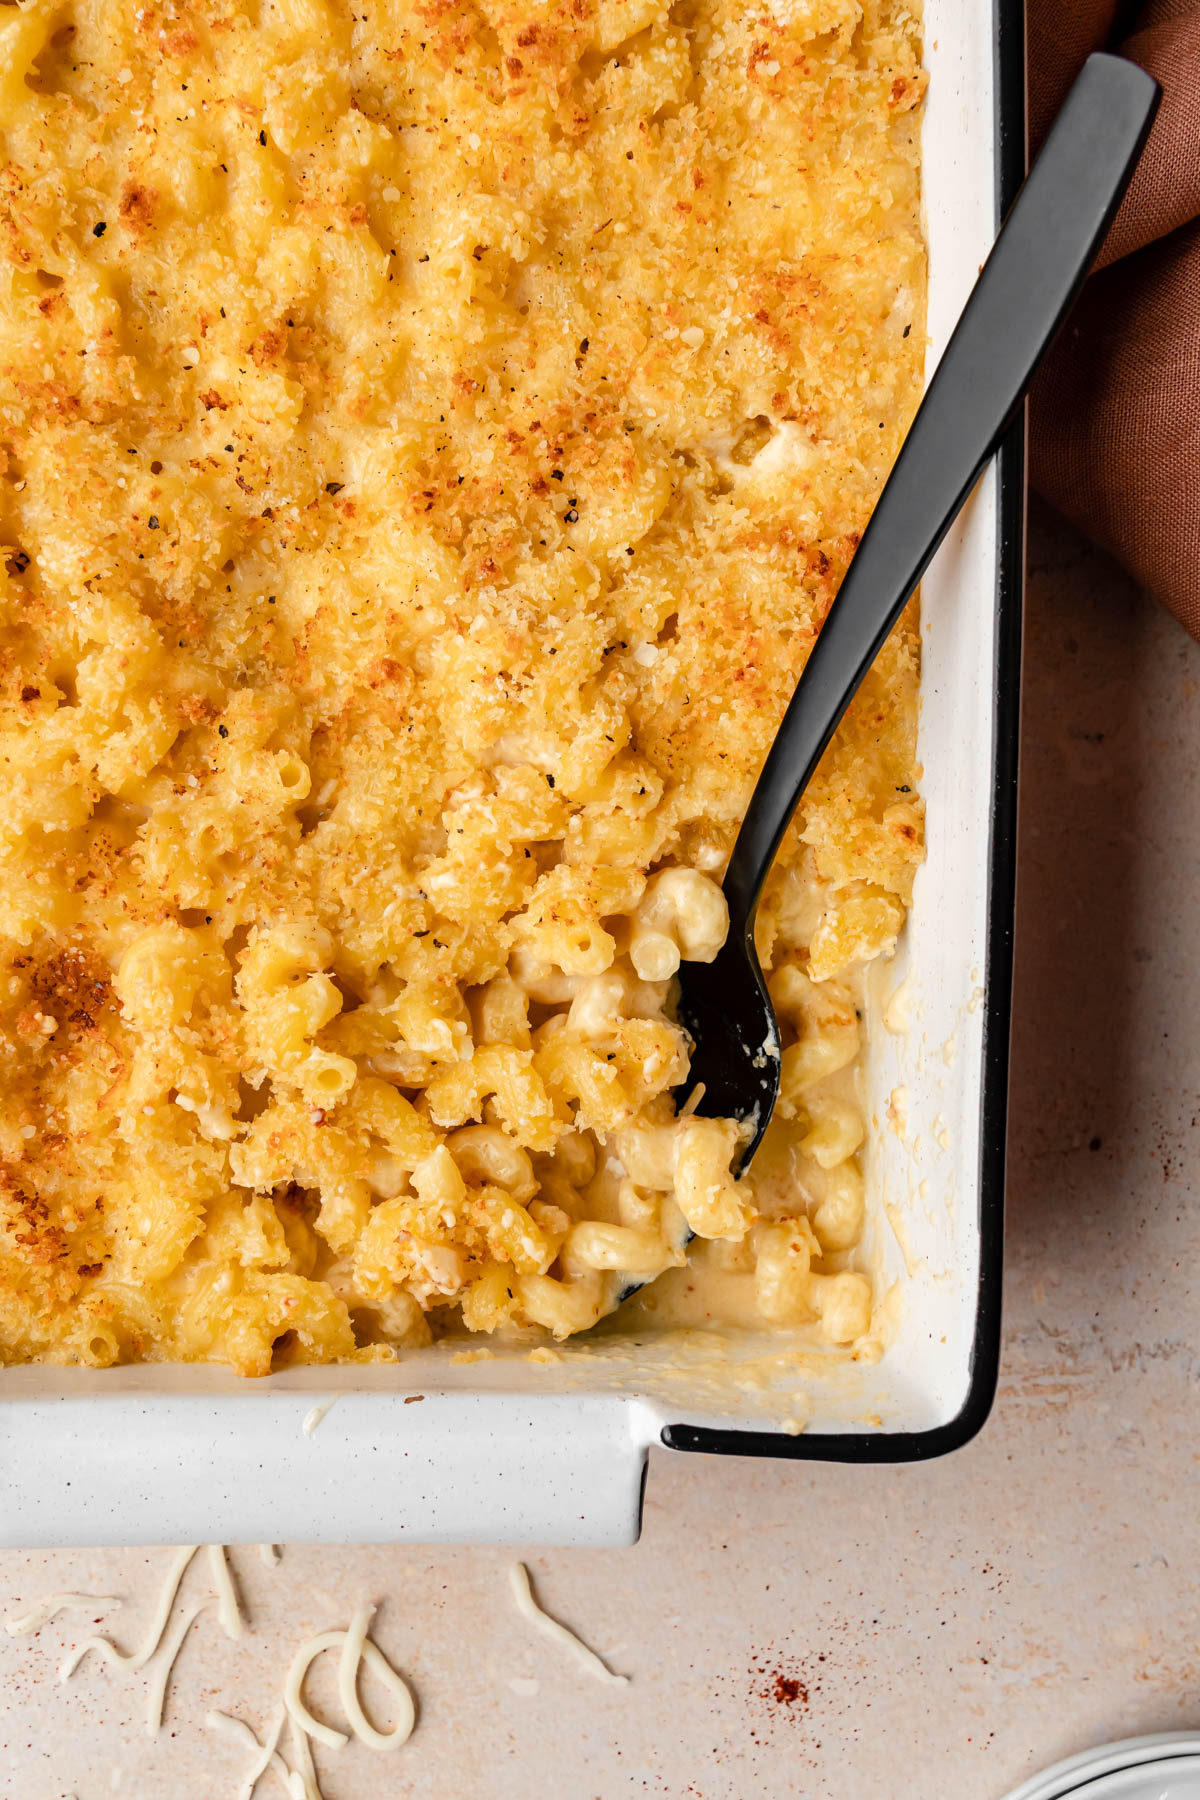
This homemade Cavatappi Mac and Cheese is the ultimate comfort food! A rich, ultra creamy, and 3-cheese sauce generously coats spiral-shaped cavatappi pasta for the best baked mac and cheese ever. And why not add in a 4th layer of cheese with a crunchy Parmesan-Panko topping? This is a classic side dish turned up a notch!
Jump to:
🧀 Rich, Decadent, and Super Cheesy
Holidays, potlucks, and parties never seem complete unless a casserole of mac and cheese is present. It is everybody's favorite comfort food for a reason. Hearty, bouncy pasta covered in an irresistible creamy cheese sauce.. what's not to love?
I'll take macaroni and cheese in all its forms - stovetop, baked, frozen, from a box, etc. But there's something so special about homemade mac and cheese that just warms your heart and soul. It's extra ooey gooey from a sauce made from scratch. And you get to choose what types of cheese to use. Win win.
Change It Up With Cavatappi
I know macaroni always gets the love but I'll let you in on a secret... cavatappi pasta is actually my favorite for a creamy sauce. Think of it as the grown up version of elbow pasta. The tubular, corkscrew shape makes it heartier and bouncier so it's more satisfying with every bite. And if you can find the ones with ridges, it'll catch even more of the cheese sauce.
There's no right or wrong when it comes to this quintessential comfort dish, but this delicious Cavatappi Mac and Cheese follows an old fashioned, tried-and-true method. It starts with a traditional roux, then milk and shredded cheese is added in to create a silky smooth cheese sauce. Punch it up with chicken broth for savoriness, a couple of spices, and a crunchy breadcrumb topping. Finish it up in the oven and then you get your prize: a bubbling casserole of cheesy goodness.
For more must-have holiday dishes, also try my Brown Butter Garlic Mashed Potatoes, Bang Bang Brussels Sprouts, Sausage, Apple, and Cranberry Stuffing, or Vietnamese Shrimp Toast!
Why You'll Love It
- Easy: This baked Cavatappi Mac and Cheese involves a few steps, but the recipe is easy to follow! Make sure to have all your ingredients measured out and prepped for a seamless experience.
- 4 different cheeses: More isn't always better, but in this case it is. We use 4 types of cheese in this Cavatappi Mac and Cheese: cheddar, Gruyere, mozzarella, and Parmesan. All classic but with their own purpose.
- Great for a crowd: This baked casserole can be made in advance for holidays or parties. It's also big enough to serve a crowd at potlucks, gatherings, and events. Adults and kids will love it!
🧂 Ingredients
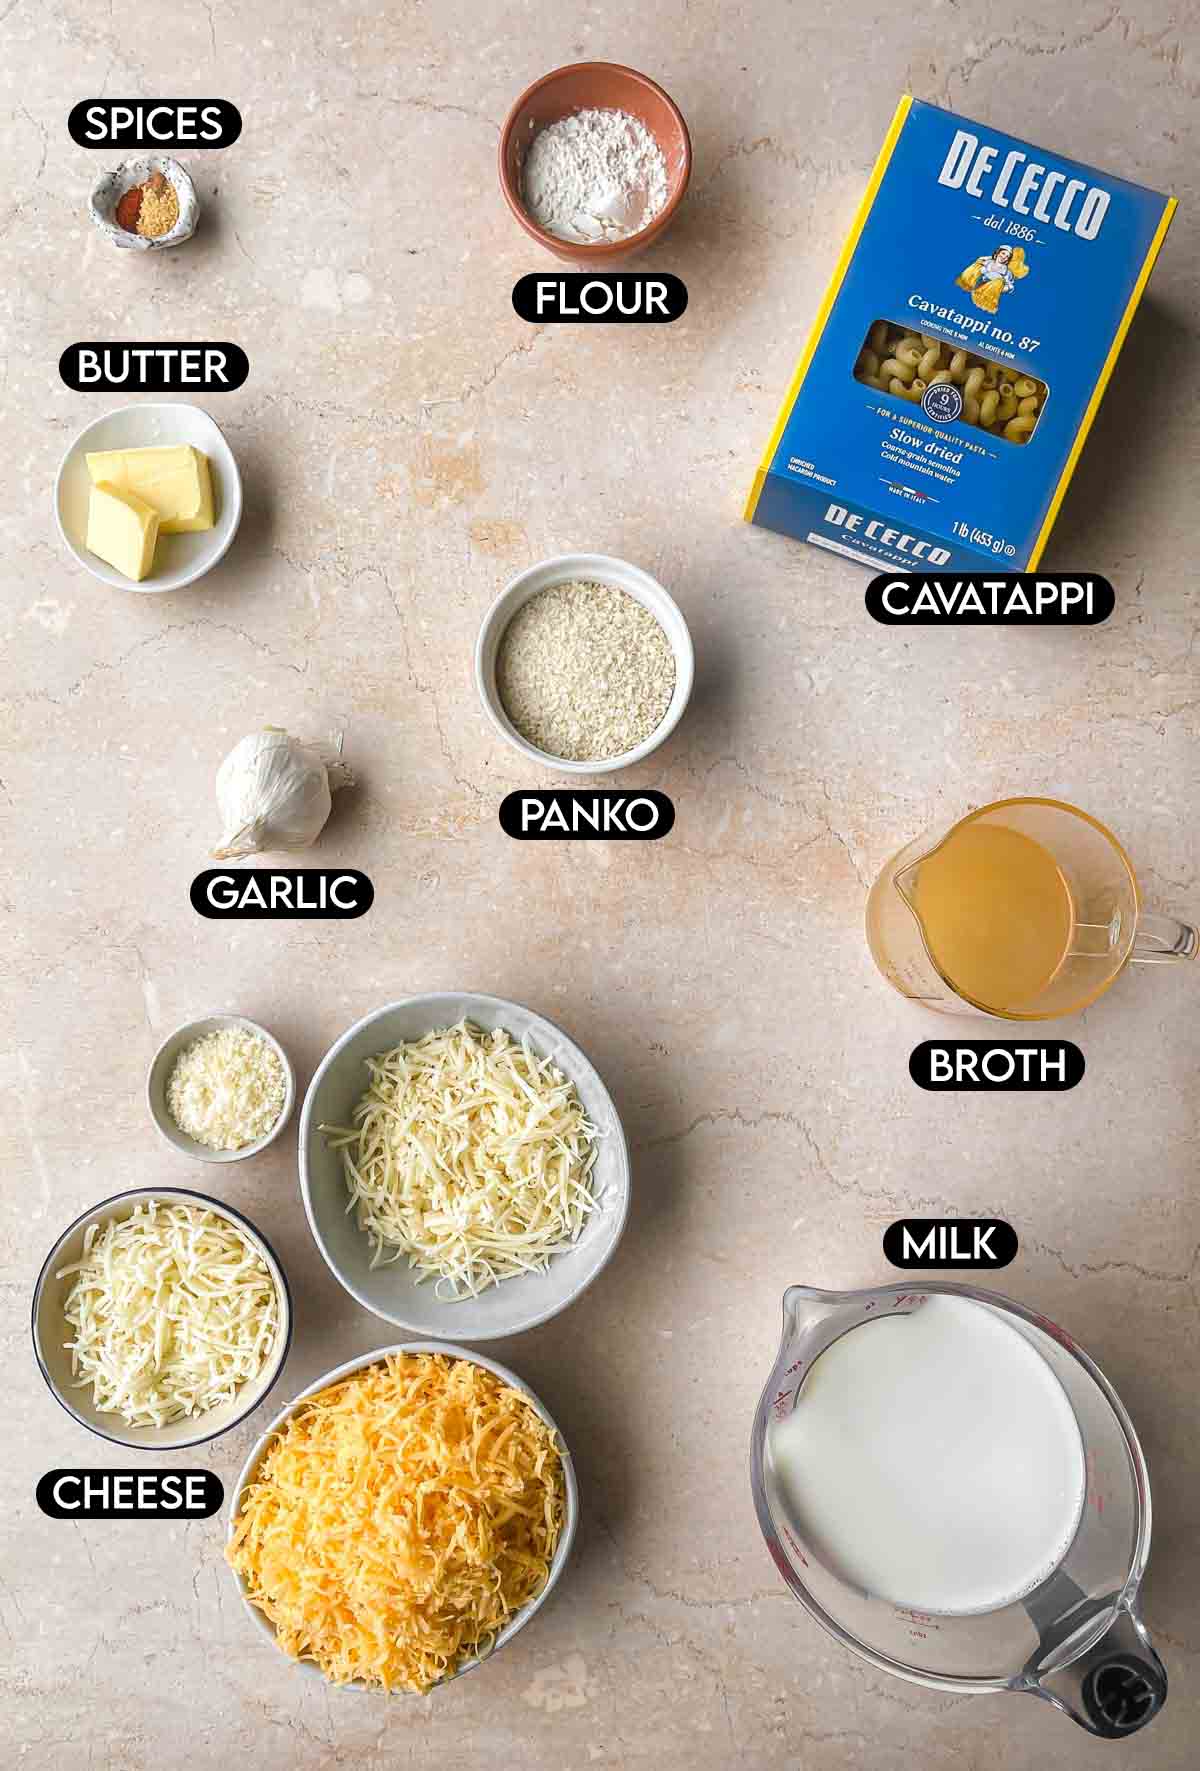
- Cavatappi pasta: One of my all time favorite pasta shapes! Cavatappi translates to "corkscrew" in Italian, and its spiral shape is great for catching sauces. I also use it in my Pea, Burrata, and Prosciutto Pasta Salad. Cavatappi is my personal favorite for mac and cheese, especially when I want something a little "fancier" for holidays.
- Butter: The start of our roux and helps crisp up the breadcrumb topping. I recommend using unsalted butter for better control of the seasoning.
- Flour: For the roux to thicken our cheese sauce.
- Milk: I use whole milk for a gooier sauce. You can use half and half in its place for a creamier, thicker sauce.
- Chicken broth: For more flavor and savoriness. I cook exclusively with unsalted bone broth. It's rich in collagen, supports digestion, and has anti-inflammatory components.
- Cheese: You can use any type of cheese you'd like, but I like to use the following combo:
- Sharp cheddar: A classic must-have and the base of our sauce. Sharp will have the strongest flavor compared to medium or mild cheddar. Since it's a key player, use sharp cheddar so the flavor doesn't get lost.
- Gruyere: A hard cheese that melts wonderfully and is popularly used in fondue. It has a nutty, earthy flavor.
- Mozzarella: Milky, creamy, and mild. Makes the sauce extra creamy.
- Parmesan: For the crunchy topping. Adds a salty umami punch.
- Paprika, mustard, and nutmeg: Optional, but I like to add a couple of spices for even more flavor. Paprika won't make it spicy, but adds a subtle smokiness. Mustard adds tang and the tiniest pinch of nutmeg adds a floral up-note.
- Panko breadcrumbs: I'm all about texture so a crispy, golden Panko topping is a must when it comes to mac and cheese.
Substitutions & Variations
- Of course, any tubular pasta shape would work in this recipe. Elbows (macaroni), shells, penne, fusilli, rotelle, or radiatori would all work. The more nooks and crannies, the better.
- Replace whole milk with half and half or heavy cream for a thicker sauce. You can also replace the broth with additional cream.
- Use your favorite cheeses! Great melting cheeses include Gouda, fontina, Monterey Jack, American, and even Velveeta. For more tang and cream, try cream cheese.
- To bulk up this side dish, add in some protein. Lobster, bacon, cubed chicken, ground beef, or pulled pork would taste delicious.
- Sprinkle in finely minced vegetables like jalapeno, broccoli, cauliflower, or zucchini.
- Change up your topping. Instead of Panko breadcrumbs, use crushed Cheetos (or even Flaming Hot Cheetos!) or Ritz crackers.
- To keep this vegetarian, use vegetable broth or additional milk in place of chicken broth.
👩🏻🍳 How To Make Cavatappi Mac and Cheese
⬇️ Please scroll down to the recipe card to see full ingredient amounts and instructions.
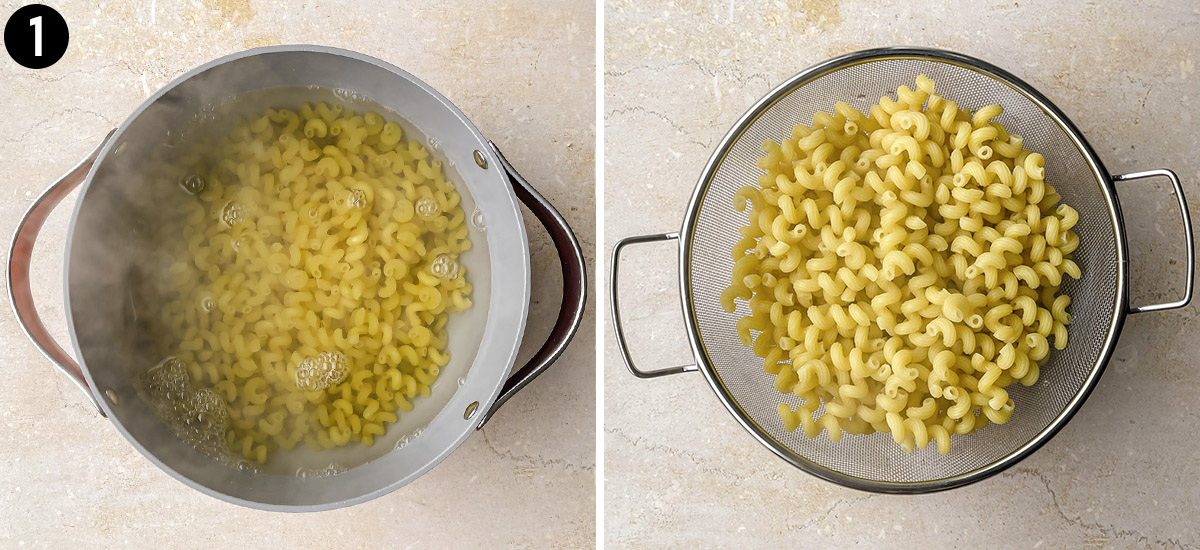
STEP ONE: First, preheat the oven to 350ºF and grease a 9x13 casserole dish.
Then bring a large pot of heavily salted water to a boil. Cook the cavatappi noodles for half the indicated time, about 4-5 minutes total. The pasta should still be very al dente and hard in the center. Drain the noodles and set aside.

STEP TWO: While the cavatappi is cooking, start on the sauce. Melt butter in a large skillet over medium heat until lightly frothy. Stir in the garlic until fragrant, about 30 seconds.
STEP THREE: Add the flour and whisk until combined - this is your roux. Whisk continuously for 1 minute to remove the raw flour taste.

STEP FOUR: Next, slowly pour in the warm milk and broth while whisking to prevent lumps. Season with salt and pepper, then continue to simmer for 8-10 minutes until the sauce can coat the back of a spoon (nappe).

STEP FIVE: Turn off the heat. Add the spices (if using) and the shredded cheese. Stir until cheese is melted and homogenous.
STEP SIX: Add the par-cooked cavatappi and mix thoroughly until evenly coated. The sauce will still look runny but this will ensure the mac and cheese doesn't dry out in the oven. You could stop here for a deliciously creamy stovetop macaroni and cheese if you wanted! Or refrigerate/freeze at this point if making Cavatappi Mac and Cheese in advance.
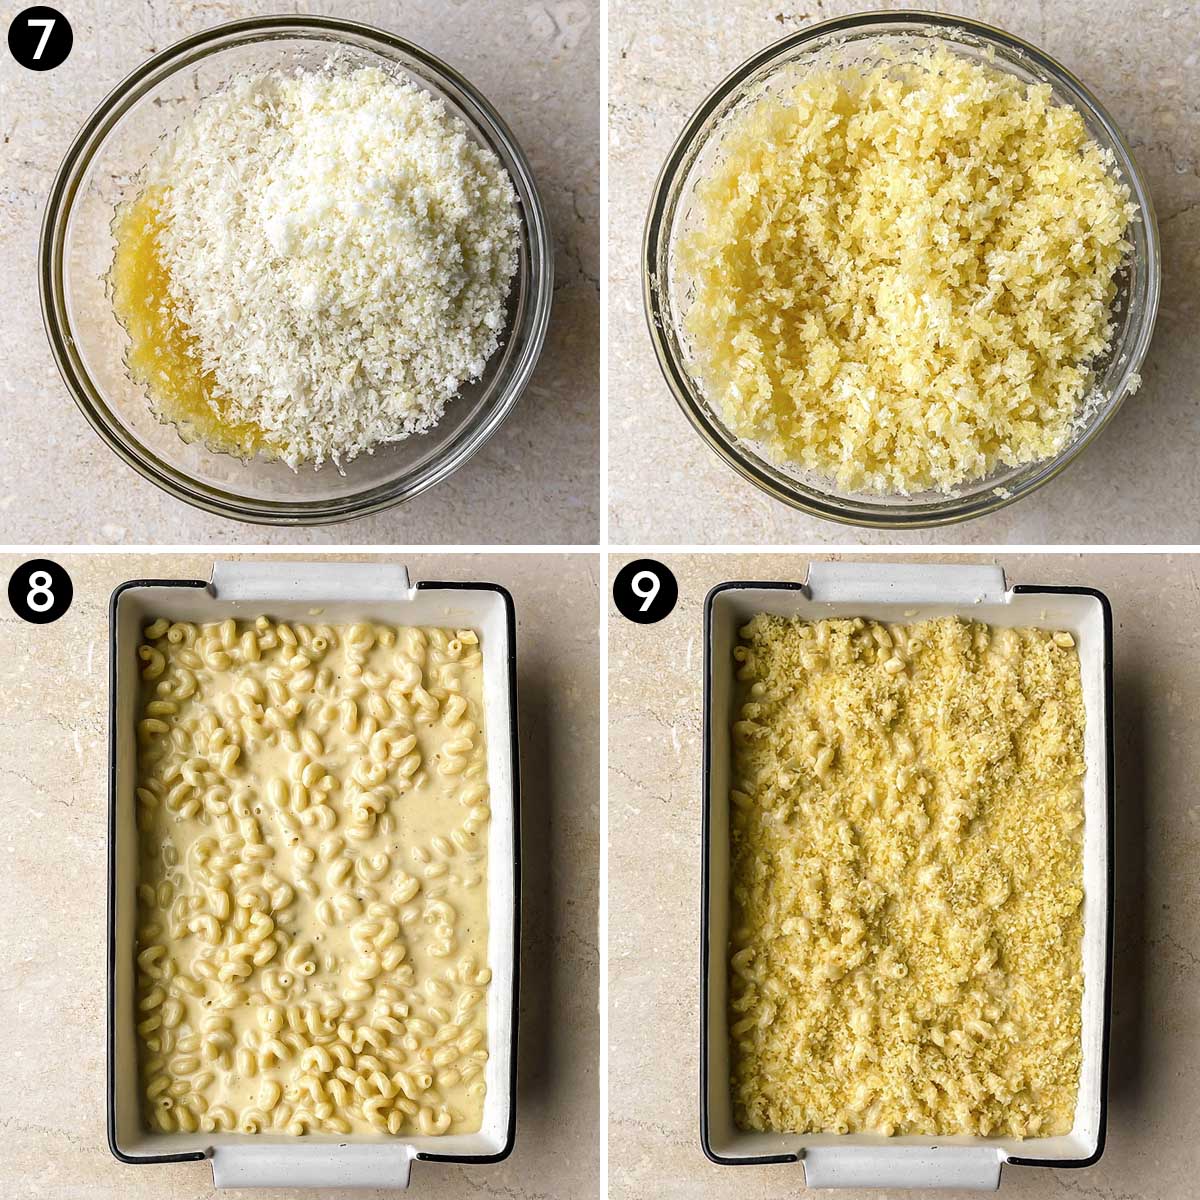
STEP SEVEN: In a small bowl, mix together melted butter, Panko breadcrumbs, and grated Parmesan cheese.
STEP EIGHT: Pour the stovetop mac and cheese into the casserole dish. Spread it out evenly.
STEP NINE: Then sprinkle the breadcrumb topping all over. Bake for 15-20 minutes until bubbly, then broil for 3-5 minutes until the top is golden and crispy. Keep an eye on it while it's broiling to prevent burns! Let cool slightly before serving.

💭 Top Tips
- Season every step. Heavily salt the pasta water and add a pinch of salt at every step for the sauce: with the roux, liquids, and cheese. This will ensure a flavorful Cavatappi Mac and Cheese.
- Only par-boil the cavatappi pasta. Since it's also going to be baked in the oven, the pasta will continue cooking. To prevent a mushy mac and cheese, boil the pasta for just 4-5 minutes. It should still be very crunchy and al dente.
- Use warm liquids. Whenever you add milk to a roux to make a bechamel sauce, make sure it's at least room temperature, or even hot, to prevent lumps. I will usually measure out my milk and broth, and then zap it in the microwave for about 30 seconds.
- If possible, shred the cheese yourself. Pre-shredded bags have anti-caking starches that will affect the texture of the sauce. Besides the mozzarella cheese, I'll buy blocks of cheddar, Gruyere, and Parmesan and shred or grate it at home. It's more affordable and melts better. It's super simple with a box grater.
🥡 Storing & Freezing
Storing: Let leftover Cavatappi Mac and Cheese cool completely. Then store in an air-tight container in the refrigerator for up to 4 days.
Freezing: I recommend freezing mac and cheese without the breadcrumb topping. After mixing in the pasta and cheese on the stovetop, let it cool completely. Divide individual portions into freezer-safe air-tight containers or zip-top bags and freeze for up to 3 months. You can thaw the mac and cheese overnight in the fridge or reheat it straight from frozen.
Reheating: Warm up the Cavatappi Mac and Cheese in the microwave in 1-minute intervals or on the stovetop over medium heat, stirring often. Add a splash of milk, water, or broth if it looks dry. If frozen, increase the time.
If reheating a large portion, you could also bake it. Preheat the oven to 325ºF and bake uncovered for 15-20 minutes until warm. Increase temp to 350ºF if straight from frozen.
Make Ahead: Cavatappi Mac and Cheese casserole can be made 1-2 days in advance, but the pasta will be softer and the sauce less creamy. For best results, make this recipe fresh.
To make in advance, follow the recipe but do not bake it yet. Pour the stovetop macaroni and cheese into the greased baking dish and let it cool to room temperature. Cover tightly with foil and store in the refrigerator. You can also mix together the breadcrumb topping in advance and store it separately in the refrigerator.
The day-of, let the casserole sit on the countertop while the oven is preheating to 350ºF. Sprinkle with breadcrumbs and then bake for 15-20 minutes, finished by a broil.

📖 Recipe FAQs
It's completely up to you and your favorite ingredients! First, the cheese will make a big difference. Add a combination of your favorite cheeses to play with the flavor. Next, add spices like paprika, garlic or onion powder, ranch seasoning, Italian blend, etc. And then finally, mix in some meat or vegetables. Bacon, sausage, green chiles, Buffalo sauce, or truffle oil are delicious!
Since this Cavatappi Mac and Cheese is going in the oven, keep the sauce extra soft and runny while it's still on the stovetop. Do not over-reduce it and use whole milk for a good combination of creamy yet runny. Also use great melting cheeses like Cheddar, Gruyere, mozzarella, fontina, or Monterey Jack.
Your sauce may feel gritty or lumpy if the liquids weren't fully incorporated into the roux (butter and flour combo). Warm the milk and broth, and slowly stream it in while whisking. Once the sauce can coat the back of the spoon, turn off the heat to mix in the cheese. High heat can cause the cheese to separate.
🍽 Looking For More Comfort Food?


Love this recipe? Please leave a 5-star 🌟🌟🌟🌟🌟 rating in the recipe card below and consider leaving a comment. It's always greatly appreciated!
📋 Recipe

Cavatappi Mac and Cheese
Ingredients
- 1 lb cavatappi pasta
- ¼ cup unsalted butter
- 6 tablespoon all-purpose flour
- 3-4 cloves garlic minced
- 3½ cups whole milk warmed
- 1 cup unsalted or low sodium chicken broth warmed
- 2½ cups sharp cheddar cheese shredded; about 10 oz
- 1 cup Gruyere cheese shredded; about 3-4 oz
- ¾ cup mozzarella cheese shredded
- Salt and pepper to taste
Optional Spices
- ½ teaspoon paprika
- ½ teaspoon ground mustard
- Tiny pinch of ground nutmeg
Crispy Panko Topping
- 2 tablespoon unsalted butter melted
- ½ cup Panko breadcrumbs
- 2 tablespoon Parmesan cheese grated
Instructions
- Preheat oven to 350°F and grease a 9x13 casserole dish.
- Bring a large pot of heavily salted water to a boil. Par-cook cavatappi pasta for about 4-5 minutes, or half of package instructions. It should still be quite hard and very al dente. Drain and set aside.
- Meanwhile, in a large skillet, melt ¼ cup butter over medium heat until lightly foamy. Stir in garlic until fragrant, about 30 seconds. Then whisk in flour and let cook for 1-2 minutes, constantly stirring.
- Gradually pour in warm milk while whisking until smooth. Then repeat with the warm broth. Add ½ teaspoon salt and pepper each and let simmer over medium-high heat for 8-12 minutes, stirring often. The sauce should be able to coat the back of a spoon at this point.
- Turn off the heat. Add the cheddar, Gruyere, and mozzarella cheeses along with the spices if you're using them. Stir to melt the cheese, then add the pasta. Mix thoroughly and season to taste. Transfer the whole mixture to the casserole dish.
- In a small bowl, combine 2 tablespoon melted butter, Panko breadcrumbs, and Parmesan cheese. Stir to combine. Sprinkle evenly over the macaroni and cheese.
- Bake for 15-20 minutes until golden and bubbly. Then broil for an additional 3-5 minutes but make sure to keep an eye on it. Let cool slightly before serving.
Notes
- Replace whole milk with half and half or heavy cream for a thicker sauce. You can also replace the broth with additional cream.
- Use your favorite cheeses!.Great melting cheeses include Gouda, fontina, Monterey Jack, American, and even Velveeta. For more tang and cream, try cream cheese.
- To keep this vegetarian, use vegetable broth or additional milk in place of chicken broth.


Jewel
Made this for a potluck, cause I wasn’t sure if I would be able to eat what the other people brought so I made my own stuff and I kept the maca snd chess all to myself, it was so good! (I did replace the broth with more milk)
Jessica
Thank you for your kind words Jewel!
Allison
Thank you for this very simple/easy to follow and delicious recipe! The ratios for the sauce were perfect. I followed the recipe exactly, except I added some chopped bacon, and it was great. Thanks again.
Jessica
Thank you Allison!
Tor
I usually hate recipe blogs (the formatting, the 50+ ads that make your scrollbar jump around as they load, etc.) and have never felt the need to comment on one until now. I just wanted to say I appreciate the easy layout of this page, the unintrusive ads, and the quick links for jumping to the sections!
This recipe was my first time ever making mac & cheese and it turned out great! I doubled and made in 2 casserole dishes but felt like it could have used just a little more pasta (my personal preference) to soak up even more of this super gooey delicious sauce. Definitely a keeper and I'll be making this again in the future.
Thanks!
Jessica
Thank you for your kind words, Tor!