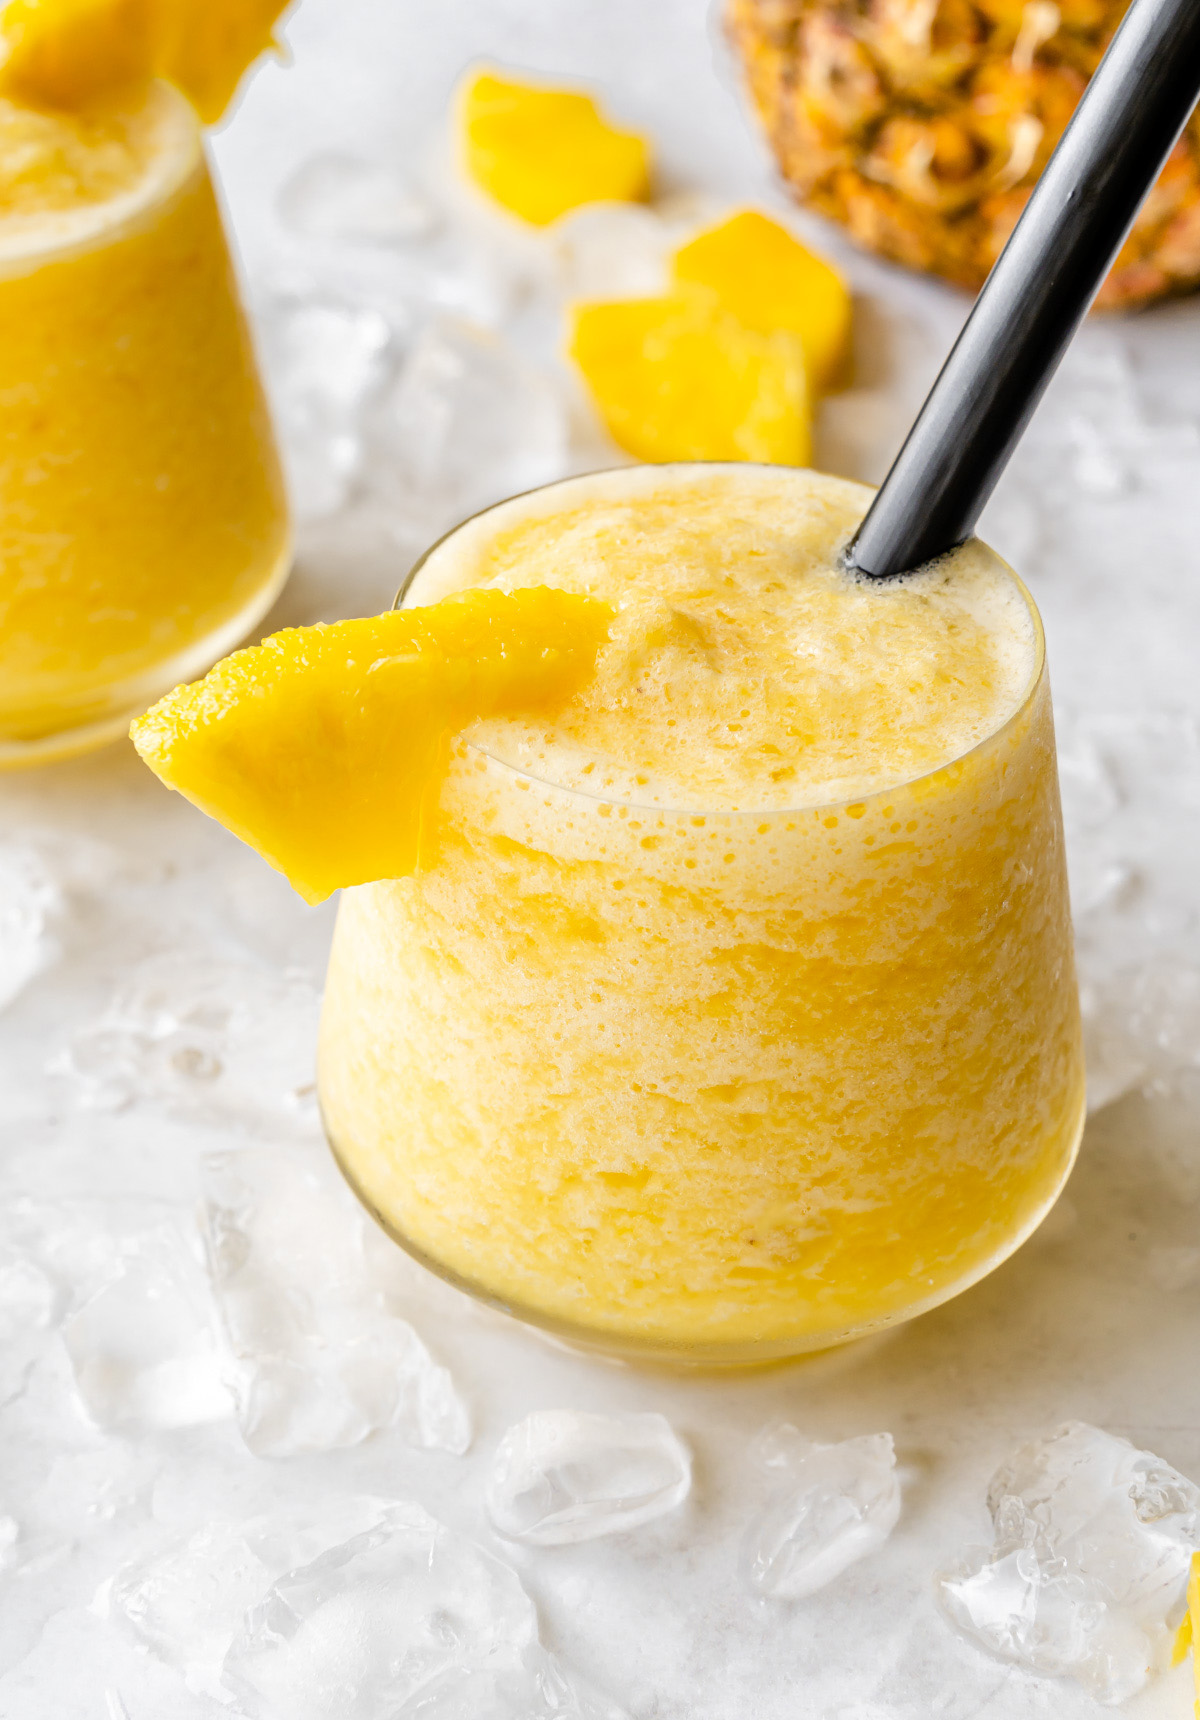
Say hello to summer's favorite frozen drink, the Pineapple Slushie! This easy and refreshing treat is loaded with fresh fruit for a simple yet healthy drink. Only 2 ingredients and 10 minutes needed!
Jump to:
🍍 The Easiest Summer Drink
This DIY Pineapple Slush is going to be on repeat all summer long! It's a great healthy alternative to those sugar-laden popsicles or snow cones but every bit as refreshing. With just two ingredients and an optional sweetener, this frosty drink couldn't be easier to make at home! If you're looking for another hydrating cold drink, Classic Milk Tea with Boba and Lychee Lemonade are more of my favorites.
Slushie vs Slush vs Icee
So what exactly is a slushie? It's basically a flavored ice drink, similar to granitas or shaved ice. There's no real difference between a slushie/slushy, slush, or icee - just different names referring to the same drink. Slurpees, on the other hand, are a specific brand of slushes that are found at the convenience store 7-Eleven.
Why You'll Love It
- Healthy: Convenience or gas store slush drinks are filled with artificial coloring, refined sugar, and processed syrups. Making your own all-natural slushie at home is going to be healthier (and more affordable) than purchasing it. Plus, this recipe is paleo, Whole30 compliant, gluten free, and dairy free.
- Quick: You only need 2 ingredients, a high-powered blender, and 10 minutes for this simple recipe. Easy, right?
- Kid-friendly: This pineapple slushie is sweet, cold, and portable. It's a great way to get fresh fruit in while tasting like dessert!
🧂 Ingredients
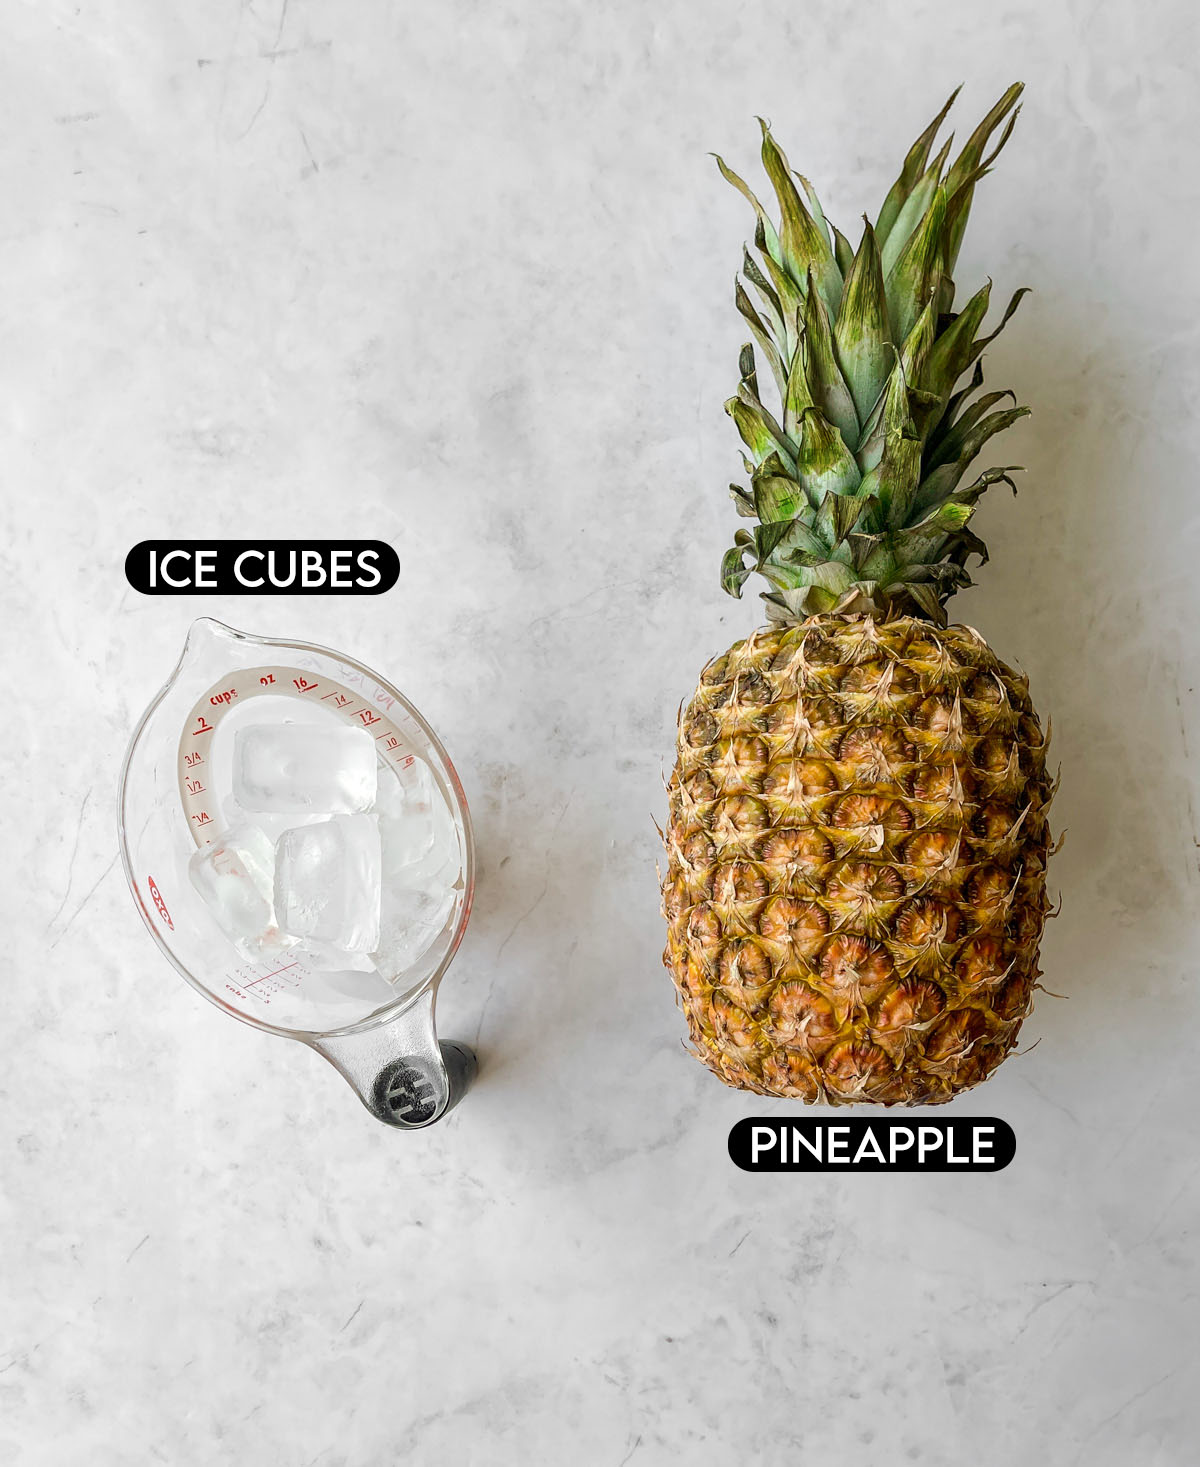
- Pineapple: Fresh pineapple is widely available year-round so I always recommend using fresh. Peak season is from March to July, which is also the best time to make this frosty drink.
- Ice: The base of our icee. I prefer larger ice cubes for better control of the final size and texture.
How To Pick A Sweet Pineapple
Did you know that pineapples don't ripen any further after they've been picked? So it's super important to find the best fruit at the store! I've got four great tips to picking a sweet, delicious pineapple.
- Look for vibrant green leaves - but the color of the fruit itself doesn't really indicate ripeness, contrary to popular belief.
- It should feel firm but still give a little when squeezed.
- The bottom should also smell sweet and fruity.
- If one of the fronds (the leaves on top) come out easily when plucked, it's ripe.
Substitutions & Variations
- Add a tiny splash of coconut extract for pina colada vibes.
- Over 21 and want to add some alcohol? White rum or vodka would be my picks for an alcoholic slushie!
- Create a mixed fruit drink if you have a lot of fruit to use up. Orange, peaches, cherries, or passion fruit are delicious pairings with pineapple.
- One of my favorite add-ins is boba (tapioca pearls)! For more information on how to cook boba, check out my recipe for Lychee Bubble Tea.
🔪 How To Make Pineapple Slushie
⬇️ Please scroll down to the recipe card to see full ingredient amounts and instructions.
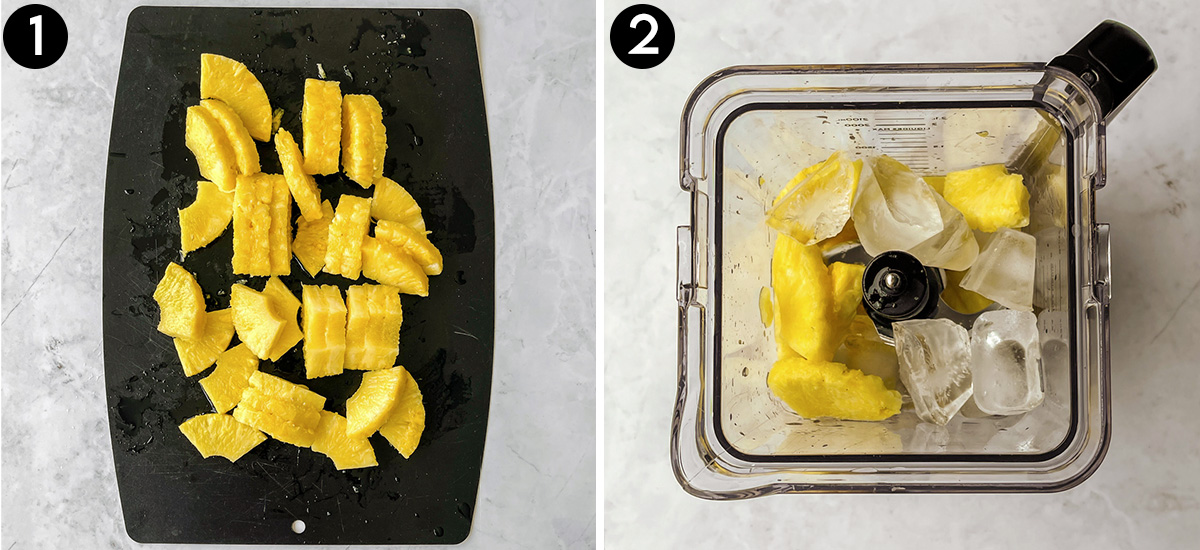
STEP ONE: Chop a fresh pineapple. My favorite way to do this is with this handy pineapple cutter. It'll cut out spiral pineapple rings, and then I cut those into quarters.
STEP TWO: Add the fresh fruit and ice to a blender. Start with a 2:1 ratio because you can always add more ice if needed. Pulse in 5 second increments until the ice breaks down into pebble-sized pieces.
💭 Top Tips
- If your pineapple isn't too sweet, feel free to add a little sweetener. Honey or coconut sugar are my go-to's.
- To get the proper icee consistency, pulse instead of blend. That way, you'll be left with more of a crushed ice texture as opposed to a smoothie.
- Make sure you have a high-powered blender that can properly break down the ice. I recommend either a Vitamix or Ninja.
- This pineapple slush can separate as it starts to melt, with frothy fruit bits on top and ice on the bottom. No worries - just give it a good stir every few minutes. I also recommend serving it in a temperature-holding cup like a Yeti tumbler.

🥡 Storing Leftovers
Storing: If you have any leftover pineapple slush, pour it into an empty ice cream container or zip-top bag. Store in the freezer for up to 2 months. To thaw, let sit out for 5-10 minutes, lightly break up, and pour into a glass or bowl.
Make Ahead: You can definitely make a large batch ahead of time. Follow the recipe as directed and then store in ice cream bucket or gallon-sized zip top bag in the freezer. For a party or large event, take it out 15 minutes before and then scoop individual servings into chilled cups.
📖 Recipe FAQs
I haven't tried making it with frozen fruit but it should work. Try 3 cups frozen pineapple with ½ cup water, and adjust until you get the right consistency.
A smoothie is usually made with fruit and milk or yogurt, then blended to a smooth consistency. Meanwhile, a slush has crushed ice consistency and doesn't contain any dairy.
This healthy tropical fruit is loaded with nutrients, antioxidants, and anti-inflammatory enzymes. They're particularly high in vitamin C and bromelain, a digestive enzyme that helps break down protein.
🍽 Looking For More Summer Treats?


Love this recipe? Please leave a 5-star 🌟🌟🌟🌟🌟 rating in the recipe card below and consider leaving a comment. It's always greatly appreciated!
📋 Recipe

Pineapple Slushie
Equipment
Ingredients
- 3 cups fresh pineapple chopped; about 1 large pineapple
- 1½ cups ice cubes
- Coconut sugar (optional)
Instructions
- Add pineapple to a blender. Start with a 2:1 ratio of pineapple to ice cubes. So for 3 cups of pineapple, add 1½ cups of ice.
- Pulse until ice is broken up but not completely pulverized, about 45 seconds. Taste and add sugar, if preferred.
Notes
- Serving size ranges from 2-4, depending on size of the drink.
- Use a pineapple corer to make prepping pineapple a breeze.
- If your pineapple isn't too sweet, feel free to add a little sweetener. Honey or coconut sugar are my go-to's.
- Make sure you use a high-powered blender that can properly break down the ice. I recommend either a Vitamix or Ninja.
- This pineapple slush can separate as it starts to melt, with frothy fruit bits on top and water on the bottom. No worries - just give it a good stir every few minutes. I also recommend serving it in a temperature-holding cup like a Yeti tumbler.


Comments
No Comments